When Blender 2.80 was released in the last half of 2019, its interface got quite the overhaul. For “Blender old farts” like me, there’s still quite a lot that’s familiar, but the Blender development team also added a whole bevy of things that are entirely new (to Blender users) ways to interact with objects in our 3D scenes. One of the things added were explicit tools for working on objects, in all of the various modes available in Blender. In Blender For Dummies, 4th edition, I actually didn’t have enough space to cover all of these tools. This article has the aim of remedying that.
When working on mesh objects in Blender, you can Tab into Edit mode and the Toolbar along the left side of the 3D Viewport gets populated with an assortment of tools that you can use for editing the geometry of your mesh object. Of course, for long-time Blender users, the fast tried-and-true hotkey methods for operating on a mesh are still there, but these tools are still convenient and certainly make migrating to Blender from other applications much less intimidating.
Other than using the Tab hotkey, you can also get to Edit mode by using the Mode roll-out menu in the 3D Viewport’s header or by switching to the Modeling workspace.
So here’s a drill-through list of each of these tools.
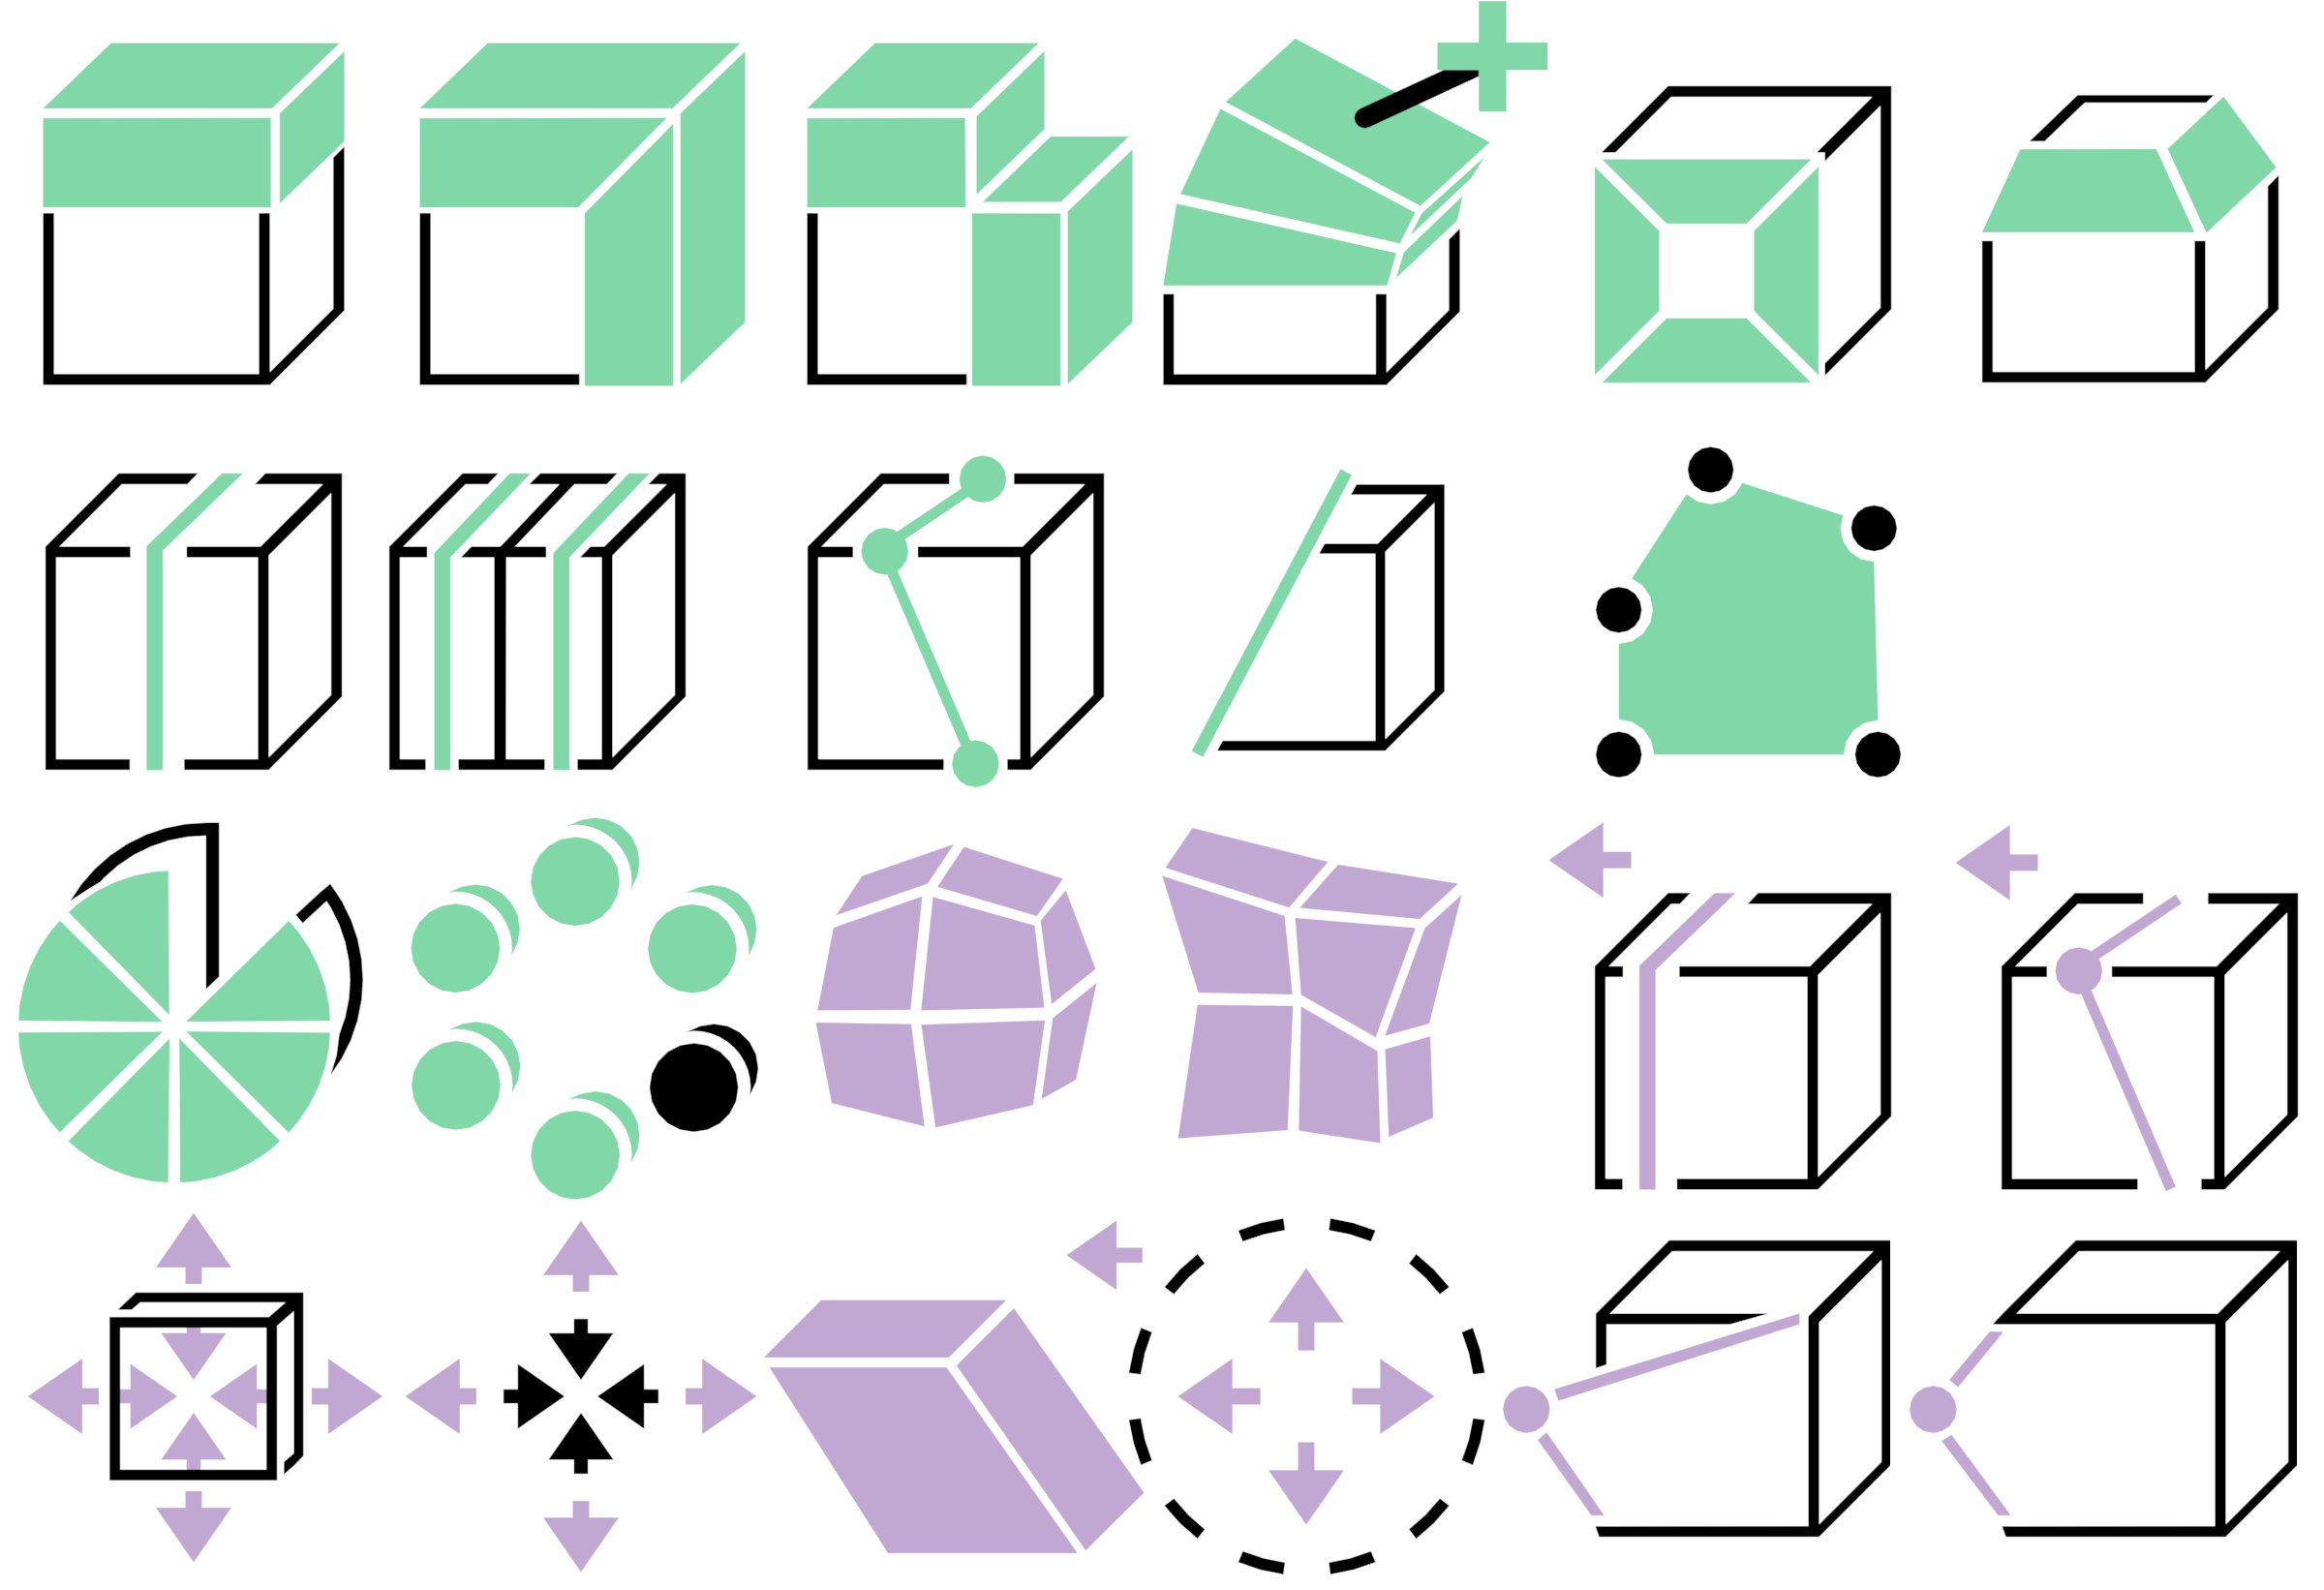
Tools that add geometry
The following tools add more vertices, edges, or faces to your mesh:
- Extrude: Extrusion is how you add more connected vertices, edges, and faces to your mesh models. Chapter 4 has a whole section dedicated to these tools, but here’s a quick run-down of what’s available when you long-press this button in the Toolbar.
-
 Extrude Region: Choose this tool and you get a gizmo in the 3D Viewport that allows you to extrude your whole selection as a single unit in one direction.
 -
 Extrude Along Normals: This tool works similarly to Extrude Region, but your extruded components move along their individual normals.
 -
 Extrude Individual: This tool’s behavior is like the Extrude Along Normals tool, but components (typically faces) aren’t extruded as a single unit. Instead, each face is extruded as if it were extruded independently.
 -
 Extrude to Cursor: With this tool, your selection is extruded as a single unit, but directly to the location of where you click your mouse cursor in the 3D Viewport.
-
-
 Inset Faces: Whereas your typical extrude operation adds more faces to your model and then automatically lets you move them around, the Inset Faces tool is more like extruding and immediately scaling to add geometry within a selected set of faces. There’s more detail on using the Inset Faces tool in Chapter 5.
 -
 Bevel: There’s no such thing as a perfect edge in meatspace. Just about every corner has at least some amount of beveling, or rounding, to it. The Bevel tool is an excellent way to give your models that added realism. See the section “Rounding your corners by beveling” in Chapter 5 of the book for more on working with the Bevel tool.
 - Loop Cut: As described in Chapter 5, loops in a mesh are a continuous path of vertices, edges, or faces along the surface of your mesh. Blender’s loop-cut tools give you the ability to add more geometry along these loops.
-
 Loop Cut: The Loop Cut tool is the base tool for adding loops to your mesh. When you select it and move your mouse cursor over your mesh, Blender provides a little preview of the potential route of new vertices and edges added by your loop cut.
 -
 Offset Edge Loop Cut: There’s no previsualization for this tool, but if you click and drag on an existing edge loop, this tool creates a new edge loop on either side of it.
-
- Knife: Blender gives you two tools for cutting arbitrary shapes into your mesh. There’s more detail on them in Chapter 5, but here’s a quick rundown of the basics of each:
-
 Knife: Choose this tool and your mouse cursor changes to look like a precision craft knife. With this tool active, you can basically draw arbitrary shapes on the surface of your mesh and Blender adds the necessary geometry to make that happen.
 -
 Bisect: Whereas the Knife tool allows you to cut geometry into the surface of your mesh, the Bisect tool gives you the ability to add geometry through your mesh, as if cutting it with a plane with whatever orientation you’d like.
-
-
 Poly Build: When you first activate the Poly Build tool, it may seem like you can’t do very much with it. Clicking in the 3D Viewport just adds a single vertex. However, don’t be deceived. The Poly Build tool is actually an incredibly useful tool for retopologizing sculpted geometry. There’s more on retopo and the Poly Build tool in Chapter 6.
 - Spin: There’s more on the Spin tools in Chapter 5, but the gist is that these two tools allow you to grow geometry from your selection in a radial way. One key tip for these tools: You’ll get the best results by using the Cursor transform orientation (remember that you can change transform orientations from the roll-out menu in the 3D Viewport’s header).
-
 Spin: Think of the Spin tool like a very fancy variant of the Extrude Region tool. With this tool, you can very quickly generate a series of evenly spaced extrusions along the shape of an arc.
 -
 Spin Duplicates: Whereas the Spin tool is like extruding radially, the Spin Duplicates tool is like making copies of your selection and arranging them radially. You can use this tool to very quickly make things the petals of a flower or tickmarks on the face of an analog clock.
-
Tools that modify geometry
The following tools have a violet accent color, indicating that they’re used for modifying existing geometry in your meshes:
- Smooth: Rather than think of these as smoothing tools, I prefer to think of them as vertex tweak tools. They don’t create any geometry; they just adjust the position of the geometry you’ve selected in your model.
-
 Smooth: Click and drag in the 3D Viewport and Blender does a smoothing operation on your selected vertices, trying to evenly distribute the vertices in your selection.
 -
 Randomize: In contrast with the Smooth tool, the Randomize tool shifts the vertices in your selection to give them a more random distribution, often making the surface of your mesh more rough looking.
-
- Slide: The slide tools move your selected geometry along the surface of your mesh. They’re an excellent way to adjust your geometry without drastically deforming the general shape of your mesh.
-
 Edge Slide: With one or more selected edges, you can use the Edge Slide tool to move those edges along their adjoining faces.
 -
 Vertex Slide: The Vertex Slide tool is similar to Edge Slide, but it works at the vertex level, sliding your selection along their adjoining edges.
-
- Shrink/Fatten: These two tools work a little bit like scaling, but they use a slightly different frame of reference.
-
 Shrink/Fatten: When you use the Shrink/Fatten tool, you’re moving all your selected faces along their local normals. I sometimes like to think of this tool as an “erosion/accumulation” tool because that’s a bit like how it feels when you use it on a whole mesh.
 -
 Push/Pull: The Push/Pull tool is similar to Shrink/Fatten, but with a bit of a nuanced difference. It’s like a compromise between Shrink/Fatten and Scale. Like Shrink/Fatten, this tool moves all your selection a uniform distance. However, like Scale, you can choose the reference point that the selection is moving relative to (such as the median point of the selection or the location of the 3D cursor). This tool can be quite useful when working on mechanical models.
-
- Shape Deformation: The two tools in this button area are most useful for modifying the overall shape of your selection.
-
 Shear: This is the default tool that you see. With it activated, you get a gizmo that lets you move the components in your selection parallel to a plane that intersects them. In 2D shapes, shearing is a quick way of changing a rectangle into a parallelogram.
 -
 To Sphere: I tend to use this tool a lot more frequently than the Shear tool. With this tool active, you can click and drag in the 3D Viewport and Blender pushes the vertices in your selection to make their shape as sphere-like as possible.
-
- Rip: In 3D mesh modeling, when you rip a selection from the mesh, you’re partially disconnecting it and creating new geometry based on your selection. If you have a string of edges selected and you rip them, it almost feels like you’re unzipping that part of the mesh. Blender has two main rip tools:
-
 Rip Region: When you use this tool on a selection in the 3D Viewport, you basically create a hole between your formerly selected vertices and your newly ripped ones.
 -
 Rip Edge: The Rip Edge tool operates similarly to the Rip Region tool, but instead of leaving a hole in the gap between old and new vertices, Blender keeps that space filled with new faces. In that way, the Rip Edge tool is like a combination of the Extrude tool and the Poly Build tool.
-
And there you have it! A quick rundown of each of the tools available when you enter Edit mode on a mesh object. Play around with them and get a good feel for how they work. Using these tools and a bit of imagination, you can create just about anything that comes to your mind.
Latest Posts
Stickman!
Baking Texture Maps from Your Mesh